Archive 27. Juli 2021

WordPress Installation unter Linux

Updaten

apt-get update
apt-get upgrade

Schritt 1 – Installiere einen MySQL Server

apt-get -y install mysql-server
mysql_secure_installation
$ mysql_secure_installation
NOTE: RUNNING ALL PARTS OF THIS SCRIPT IS RECOMMENDED FOR ALL MySQL
SERVERS IN PRODUCTION USE! PLEASE READ EACH STEP CAREFULLY!
In order to log into MySQL to secure it, we'll need the current
password for the root user. If you've just installed MySQL, and
you haven't set the root password yet, the password will be blank,
so you should just press enter here.

Enter current password for root (enter for none):
OK, successfully used password, moving on...

Setting the root password ensures that nobody can log into the MySQL
root user without the proper authorisation.

You already have a root password set, so you can safely answer 'n'.

Change the root password? [Y/n] n
... skipping.

By default, a MySQL installation has an anonymous user, allowing anyone
to log into MySQL without having to have a user account created for
them. This is intended only for testing, and to make the installation
go a bit smoother. You should remove them before moving into a
production environment.

Remove anonymous users? [Y/n] y
... Success!

Normally, root should only be allowed to connect from 'localhost'. This
ensures that someone cannot guess at the root password from the network.

Disallow root login remotely? [Y/n] y
... Success!

By default, MySQL comes with a database named 'test' that anyone can
access. This is also intended only for testing, and should be removed
before moving into a production environment. 

Remove test database and access to it? [Y/n] y
- Dropping test database...
ERROR 1008 (HY000) at line 1: Can't drop database 'test'; database doesn't exist
... Failed! Not critical, keep moving...
- Removing privileges on test database...
... Success!

Reloading the privilege tables will ensure that all changes made so far
will take effect immediately. 

Reload privilege tables now? [Y/n] y
... Success!

Cleaning up...

All done! If you've completed all of the above steps, your MySQL
installation should now be secure.

Thanks for using MySQL!

Schritt 2 – Erhöhe die Sicherheit deines MySQL Servers

mysql -u root -p

create database wordpress;
create user wordpress@localhost identified by 'mein_passwort';
grant all privileges on wordpress.* to wordpress@localhost;
flush privileges;
exit;

Schritt 4 – Apache installieren

apt-get update
apt-get install apache2 php7.4 php7.4-mysql libapache2-mod-php7.4
service apache2 restart
apt-get install php7.4-xml php7.4-curl php7.4-gd php7.4-mbstring
apt-get install php7.4-bz2 php7.4-zip php7.4-xml php7.4-curl
apt-get install php7.4-json php7.4-opcache php7.4-readline

Konfiguration

nano /etc/apache2/sites-available/wordpress.conf
<VirtualHost *:80>
    ServerAdmin master@domain.com
    DocumentRoot /var/www/html/wordpress/
    ServerName festival.it-hense.de

    Alias /nextcloud "/var/www/html/wordpress/"

    <Directory /var/www/html/wordpress/>
       Options +FollowSymlinks
       AllowOverride All
       Require all granted
         <IfModule mod_dav.c>
           Dav off
         </IfModule>
       SetEnv HOME /var/www/html/wordpress
       SetEnv HTTP_HOME /var/www/html/wordpress
    </Directory>

    ErrorLog ${APACHE_LOG_DIR}/error.log
    CustomLog ${APACHE_LOG_DIR}/access.log combined

</VirtualHost>
a2ensite wordpress.conf
a2enmod rewrite
a2enmod ssl
a2enmod headers
a2enmod env
a2enmod dir
a2enmod mime
service apache2 restart

PHP konfiguration

sudo nano /etc/php/7.4/apache2/php.ini
file_uploads = On
max_execution_time = 300
memory_limit = 256M
post_max_size = 16G
max_input_time = 60
max_input_vars = 4440
session.gc_maxlifetime = 7200
sudo service apache2 restart

Schritt 5 – WordPress herunterladen und konfigurieren

cd /tmp
wget https://wordpress.org/latest.tar.gz
tar -zxvf latest.tar.gz
mv wordpress /var/www/html/
chown www-data.www-data /var/www/html/wordpress/* -R

Nun nur noch die Seite mittels der IP / Hostname oder Domain ansurfen und WordPress fertig einrichten.
MediaWiki Installation

LAMP-Server installieren

Installiere zunächst den Apache und den MariaDB-Server mit dem folgenden Befehl:

sudo apt-get install apache2 mariadb-server -y

Sobald beide Pakete installiert sind, musst du das Ondrej PHP-Repository zu Ihrem System hinzufügen. Du kannst es mit dem folgenden Befehl hinzufügen:

sudo apt-get install software-properties-common -y
sudo add-apt-repository ppa:ondrej/php -y

Sobald das Repository installiert ist, aktualisiere das Repository und installiere PHP zusammen mit allen erforderlichen PHP-Bibliotheken:

sudo apt-get update -y
sudo apt install php7.3 libapache2-mod-php7.3 php7.3-common php7.3-gmp php7.3-curl php7.3-intl php7.3-mbstring php7.3-xmlrpc php7.3-mysql php7.3-gd php7.3-xml php7.3-cli php7.3-zip php7.3-imagick

Sobald alle Pakete installiert sind, öffne die Datei php.ini mit dem folgenden Befehl:

sudo nano /etc/php/7.3/apache2/php.ini

Nehme die folgenden Änderungen vor:

memory_limit = 1024M
upload_max_filesize = 16G
post_max_size = 16G
date.timezone = Europe/Berlin

Speicher und schließe die Datei, starte dann den Apache und MariaDB-Dienst und ermögliche ihnen, beim Booten zu starten:

sudo systemctl start apache2
sudo systemctl enable apache2
sudo systemctl start mysql
sudo systemctl enable mysql

MariaDB konfigurieren

Sicher zunächst die MariaDB-Installation mit dem folgenden Befehl:

sudo mysql_secure_installation

Beantworten alle Fragen wie unten gezeigt:

Enter current password for root (enter for none):
Set root password? [Y/n]: N
Remove anonymous users? [Y/n]: Y
Disallow root login remotely? [Y/n]: Y
Remove test database and access to it? [Y/n]:  Y
Reload privilege tables now? [Y/n]:  Y

Sobald die MariaDB gesichert ist, melde dich bei der MariaDB-Shell an:

sudo mysql

Erstelle dann eine Datenbank und einen Benutzer für Mediawiki:

CREATE DATABASE mediadb;
CREATE USER 'media'@'localhost' IDENTIFIED BY 'password';

Als nächstes erteile dem mediadb alle Privilegien mit dem folgenden Befehl:

GRANT ALL ON mediadb.* TO 'media'@'localhost' IDENTIFIED BY 'password' WITH GRANT OPTION;

Als nächstes leere die Privilegien und verlassen Sie die MariaDB-Shell:

FLUSH PRIVILEGES;
EXIT;

Mediawiki installieren

Lade zunächst die neueste Version von Mediawiki von der offiziellen Website herunter:

wget https://releases.wikimedia.org/mediawiki/1.31/mediawiki-1.31.0.tar.gz

Wenn der Download abgeschlossen ist, extrahiere die heruntergeladene Datei mit dem folgenden Befehl:

tar -xvzf mediawiki-1.31.0.tar.gz

Kopiere anschließend das extrahierte Verzeichnis in das Apache-Wurzelverzeichnis und gebe die entsprechenden Berechtigungen ein:

sudo cp -r mediawiki-1.31.0 /var/www/html/mediawiki
sudo chown -R www-data:www-data /var/www/html/mediawiki
sudo chmod -R 777 /var/www/html/mediawiki

Erstelle anschließend eine virtuelle Apache-Hostdatei für Mediawiki mit dem folgenden Befehl:

sudo nano /etc/apache2/sites-available/mediawiki.conf

füge die folgenden Zeilen hinzu:

<VirtualHost *:80>
ServerAdmin admin@example.com
DocumentRoot /var/www/html/mediawiki/
ServerName Hier die IP des Servers eintragen
<Directory /var/www/html/mediawiki/>
Options +FollowSymLinks
AllowOverride All
</Directory>
ErrorLog /var/log/apache2/media-error_log
CustomLog /var/log/apache2/media-access_log common
</VirtualHost>

Speicher die Datei und aktiviere dann die virtuelle Hostdatei und das Apache Umschreibmodul mit dem folgenden Befehl:

sudo a2ensite mediawiki.conf
sudo a2enmod rewrite

Starte schließlich den Apache-Webserver neu, um die Änderungen vorzunehmen:

sudo systemctl restart apache2

Auf Mediawiki zugreifen

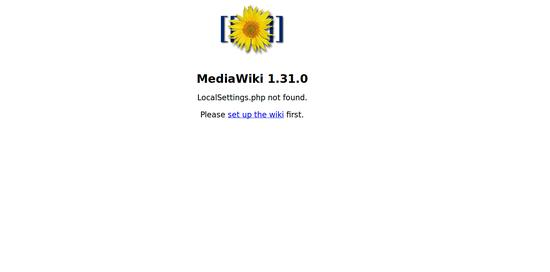
Öffne nun den Webbrowser und gebe die IP-Adresse ein. Du wirst auf die folgende Seite weitergeleitet:

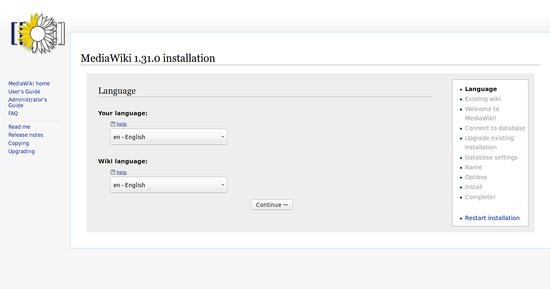
Klicken Sie nun auf die Schaltfläche Wiki einrichten. Du solltest die folgende Seite sehen:

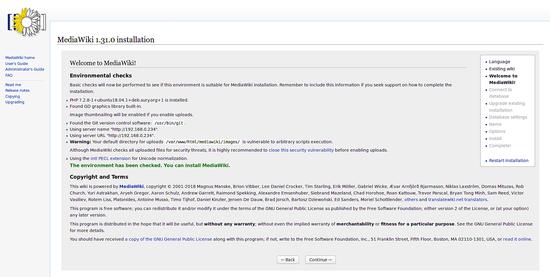
Wähle hier deine Wiki-Sprache und klicke auf die Schaltfläche Fortfahren. Du solltest die folgende Seite sehen:

Klicke nun auf die Schaltfläche Fortfahren. Du solltest die folgende Seite sehen:

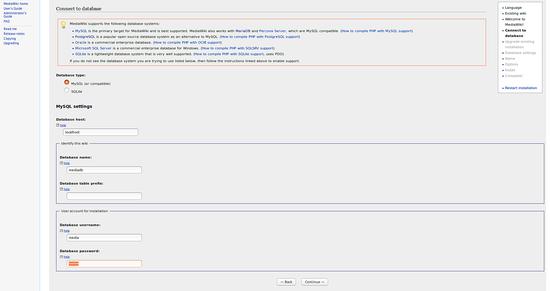
Gebe nun die Datenbankdaten an und klicke auf die Schaltfläche Fortfahren. Du solltest die folgende Seite sehen:

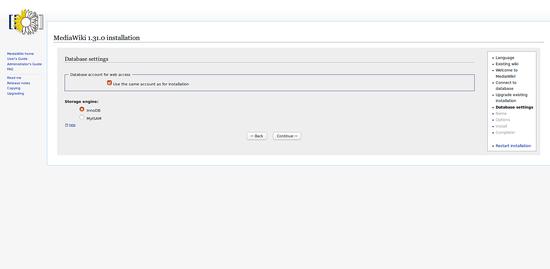
Wähle nun die Speicher-Engine aus und klicken Sie auf die Schaltfläche Fortfahren. Du solltest die folgende Seite sehen:

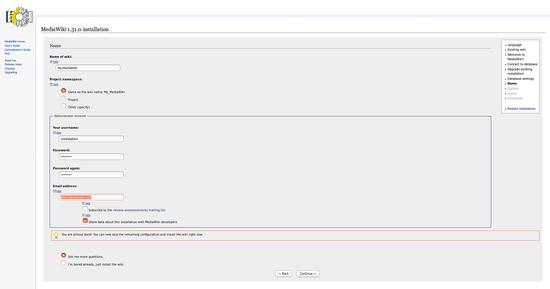
Gebe nun deinen Wiki-Sitennamen, deinen Benutzernamen und dein Passwort ein. Klicke dann auf die Schaltfläche Fortfahren. Du solltest die folgende Seite sehen:

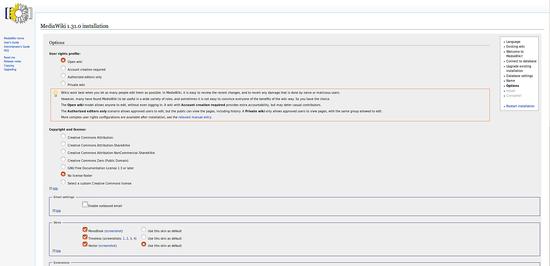
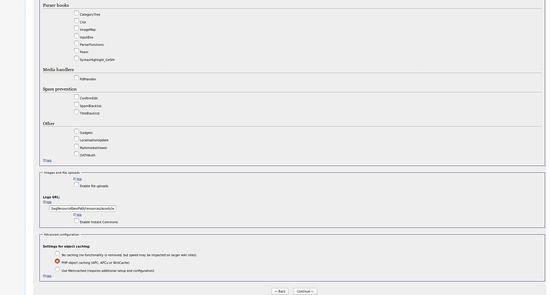
Markiere nun alle gewünschten Einstellungen und klicke im Anschluss auf die Schaltfläche Fortfahren. Du solltest die folgende Seite sehen:

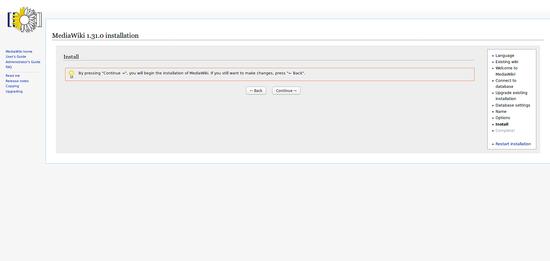
Klicke nun auf die Schaltfläche Fortfahren, um die Installation zu starten. Du solltest die folgende Seite sehen:

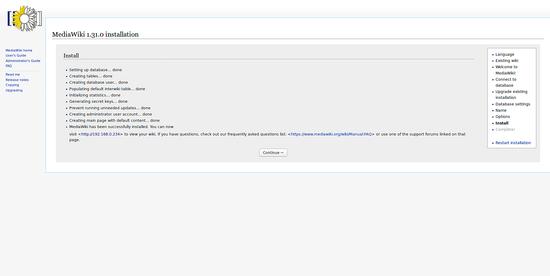
Klicke nun auf die Schaltfläche Fortfahren. Du solltest die folgende Seite sehen:

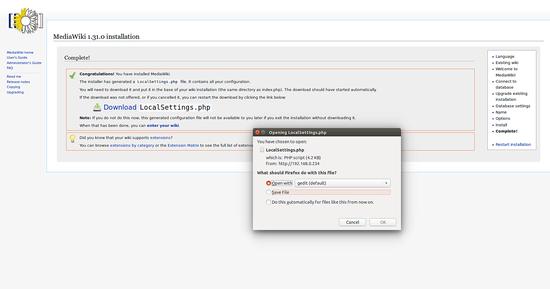
Hier musst du die Datei LocalSettings.php herunterladen und in das MediaWiki-Stammverzeichnis legen.

/var/www/html/mediawiki

Öffne nun deinen Webbrowser und gebe die IP-Adresse ein. Du solltest deine MediaWiki-Seite im folgenden Bild sehen:

Weitere Domains hinzufügen

Wenn das Wiki von mehreren IPs/Hostnamen bzw Domains erreicht werden soll muss das noch konfiguriert werden.
Öffne dazu mit dem Nanoeditor die Config

sudo nano /etc/apache2/sites-available/mediawiki.conf

Füge hier das ganze nochmal ein und ändere die Serveradresse ab

Es muss aber auch noch in der LocalSettings.php angepasst werden.

sudo nano /var/www/html/mediawiki/LocalSetting.php

NextCloud Installtion

System Updaten

apt-get update && apt-get upgrade

Apache installieren

sudo apt install apache2 -y

Verzeichnisliste deaktivieren

sudo sed -i "s/Options Indexes FollowSymLinks/Options FollowSymLinks/" /etc/apache2/apache2.conf

Starte Apache Service

sudo systemctl start apache2.service

Installiere Maria DB

sudo apt install mariadb-server mariadb-client -y

Maria DB Server Konfiguration

sudo mysql_secure_installation
Enter current password for root (enter for none): Just press the Enter
Set root password? [Y/n]: Y
New password: Gebe hier das Root Passwort ein
Re-enter new password: Repeat password
Remove anonymous users? [Y/n]: Y
Disallow root login remotely? [Y/n]: Y
Remove test database and access to it? [Y/n]:  Y
Reload privilege tables now? [Y/n]:  Y

Neustart Maria DB Server

sudo systemctl restart mariadb.service

Installation PHP

PHP-Repository hinzufügen

sudo apt-get install software-properties-common
sudo add-apt-repository ppa:ondrej/php

Repositorys Updaten

sudo apt-get update

Endgültige PHP-Installation & Module

sudo apt install php8 libapache2-mod-php8 php8-common php8-gmp php8-url php8-intl php8-mbstring php8-xmlrpc php8-mysql php8-gd php8-xml php8-cli php8-zip php8-imagick php8-ldap -y

Passe die PHP.ini Datei an

sudo nano /etc/php/8.1/apache2/php.ini

Suche hier nach folgenden Stichworten und ändere sie gegebenenfalls ab.

memory_limit = 1024M
upload_max_filesize = 16G
post_max_size = 16G
date.timezone = Europe/Berlin

Nextcloud Datenbank erstellen

Öffnen Sie den SQL-Dialog

sudo mysql

Datenbank nextcloud erstellen

CREATE DATABASE nextcloud;

Datenbankbenutzer mit Passwort anlegen

CREATE USER 'nextclouduser'@'localhost' IDENTIFIED BY 'password_here';

Zugriff auf die Datenbank gewähren

GRANT ALL ON nextcloud.* TO 'nextclouduser'@'localhost' IDENTIFIED BY 'password_here' WITH GRANT OPTION;

Änderungen sichern und beenden

FLUSH PRIVILEGES;
EXIT;

Lade die neueste Nextcloud-Version herunter

cd /tmp && wget https://download.nextcloud.com/server/releases/nextcloud-22.0.0.zip
sudo apt-get install unzip
sudo unzip nextcloud-22.0.0.zip
sudo mv nextcloud /var/www/

Konfiguriere Apache2

Erstelle eine neue conf Datei

sudo nano /etc/apache2/sites-available/nextcloud.conf
<VirtualHost *:80>
    ServerAdmin master@domain.com
    DocumentRoot /var/www/nextcloud/
    ServerName demo.domain.com
    ServerAlias www.demo.domain.com

    Alias /nextcloud "/var/www/nextcloud/"

    <Directory /var/www/nextcloud/>
       Options +FollowSymlinks
       AllowOverride All
       Require all granted
         <IfModule mod_dav.c>
           Dav off
         </IfModule>
       SetEnv HOME /var/www/nextcloud
       SetEnv HTTP_HOME /var/www/nextcloud
    </Directory>

    ErrorLog ${APACHE_LOG_DIR}/error.log
    CustomLog ${APACHE_LOG_DIR}/access.log combined

</VirtualHost>

Aktivieren Sie das Nextcloud- und das Rewrite-Modul

sudo a2ensite nextcloud.conf
sudo a2enmod rewrite
sudo a2enmod headers
sudo a2enmod env
sudo a2enmod dir
sudo a2enmod mime

Neustart vom apache Service

sudo systemctl restart apache2.service

Datenordner vorbereiten

cd /home
sudo mkdir /home/data/
sudo chown -R www-data:www-data /home/data/

sudo chown -R www-data:www-data /var/www/nextcloud/
sudo chmod -R 755 /var/www/nextcloud/

Domain ansurfen und Einrichtung abschließen


WordPress Cookie Plugin von Real Cookie Banner